Edit: There is an updated version of this article available here
================================================
Hi Folks,
================================================
Hi Folks,
in one of my first posts about game development I said I would show you how to setup a SFML development environment on Linux. Now it's time to fulfill this promise ;)
At first I want to limit the Linux distro to Ubuntu, 14.04 LTS in particular. I've only tested it on Ubuntu because I don't use any other distro anymore. Ubuntu rocks them all ;) (personal taste). Because Ubuntu is based on Debian, this article should also apply to Debian, although I haven't tested it.
The problematic part about Ubuntu 14.04, the official SFML version in the repos is 1.6, and we don't want this old one. We want the actual 2.1 stable release. There are also some more version problems with SFML dependencies, especially with GLEW. But this means we need to build it from the official source code ourselves with all dependencies solved, so everything works fine. Ok, let's do it!
The problematic part about Ubuntu 14.04, the official SFML version in the repos is 1.6, and we don't want this old one. We want the actual 2.1 stable release. There are also some more version problems with SFML dependencies, especially with GLEW. But this means we need to build it from the official source code ourselves with all dependencies solved, so everything works fine. Ok, let's do it!
After a clean Ubuntu 14.04 installation, first thing we need is a compiler. I think GCC will be sufficient enough ;) We also need the meta build tool cmake in order to build SFML. Open a terminal (ctrl+alt+t) and enter the following commands
sudo apt-get install g++
sudo apt-get install cmake
After this we need all dependencies of SFML solved. Enter the following commands (order doesn't matter)
sudo apt-get install libjpeg-dev
sudo apt-get install libfreetype6-dev
sudo apt-get install libxrandr-dev
sudo apt-get install libglew-dev
sudo apt-get install libsndfile1-dev
sudo apt-get install libopenal-dev
The important part is, that we always need the developer version of these libraries in order to build SFML. Now we only need the SFML source code which can be downloaded here: http://www.sfml-dev.org/download/sfml/2.1/SFML-2.1-sources.zip
Extract the zip-file to some directory, e.g. ~/dev/sfml-master. Now we need to configure the makefiles with cmake. Switch to the extraction directory of SFML and enter the following:
cmake -G "Unix Makefiles" -D CMAKE_BUILD_TYPE=Debug -D BUILD_SHARED_LIBS=TRUE .
make
sudo make install
Don't forget the dot at the end of the cmake command. This tells cmake to use the actual working directory as source directory. Until now we only have the shared debug lib, but we also need the release libs. Therefore simply replace the CMAKE_BUILD_TYPE=Debug with Release:
cmake -G "Unix Makefiles" -D CMAKE_BUILD_TYPE=Release -D BUILD_SHARED_LIBS=TRUE .make
sudo make install
Finally if you want to link your SFML apps statically you need the static libs. Therefore repeat to two above steps for Debug and Release and change BUILD_SHARED_LIBS to FALSE:
cmake -G "Unix Makefiles" -D CMAKE_BUILD_TYPE=Debug -D BUILD_SHARED_LIBS=FALSE .
cmake -G "Unix Makefiles" -D CMAKE_BUILD_TYPE=Debug -D BUILD_SHARED_LIBS=FALSE .
make
sudo make install
cmake -G "Unix Makefiles" -D CMAKE_BUILD_TYPE=Release -D BUILD_SHARED_LIBS=FALSE .
make
sudo make install
Now you have covered all four possibilities of the libraries and you can now develop SFML projects the way you like.
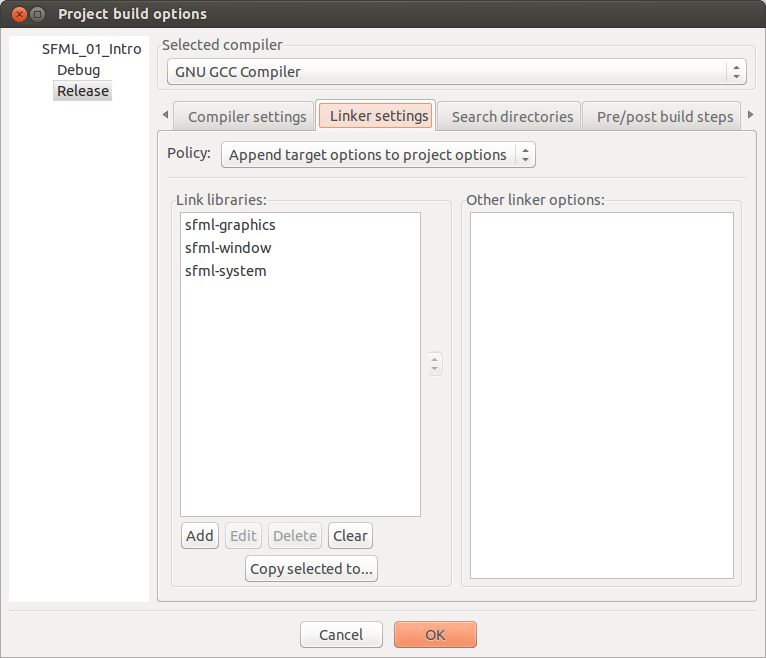
You can now start a new project in e.g. Code::Blocks (do not use the SFML-Project Template shipped with Code::Blocks, it contains legacy SFML-Code). Create a new console project and goto Build Options -> Linker Settings and add the SFML libraries to the Linker Settings:
If you need networking or audio don't forget to add these here as well (sfml-audio-d, sfml-audio, sfml-network-d, sfml-network). That's all, you are now able to write, compile & run SFML 2.1 driven applications on Ubuntu 14.04.
sudo make install
cmake -G "Unix Makefiles" -D CMAKE_BUILD_TYPE=Release -D BUILD_SHARED_LIBS=FALSE .
make
sudo make install
Now you have covered all four possibilities of the libraries and you can now develop SFML projects the way you like.
You can now start a new project in e.g. Code::Blocks (do not use the SFML-Project Template shipped with Code::Blocks, it contains legacy SFML-Code). Create a new console project and goto Build Options -> Linker Settings and add the SFML libraries to the Linker Settings:
If you need networking or audio don't forget to add these here as well (sfml-audio-d, sfml-audio, sfml-network-d, sfml-network). That's all, you are now able to write, compile & run SFML 2.1 driven applications on Ubuntu 14.04.
Cheers until next time.


No comments:
Post a Comment